Tuesday, January 26, 2016

Pinterest Projects I Actually Completed: Simple Vintage Valentine's Decorating

alt="valentines day tablescape"


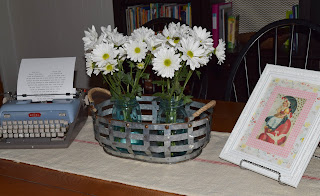
Vintage typewriters, blue glass Ball jars, daisies and old-fashioned Valentine's Day postcards--just the right ingredients for a simple and sweet vignette.

I've had this pin on my Valentine's Day pinterest board since last year and I decided that I needed to get moving or it was going to be another year before I completed this one!
alt="Beatle's Love Me Do printable"
nobiggie.net

I dug out the old typewriter I bought at a garage sale years ago and cleaned it up.  All three of our kids have loved typing on it and it actually worked at one time.  One of the little darlings got a little ambitious with the White-Out and applied it to the keys as well as their paper.  I still have some scraping to go, but I wanted to put this together to show you.

alt="typewriter heart printable"

Nobiggie.net has this adorable download of the lyrics to "Love, Love Me Do" in the shape of a heart.  It's an easy printable and you just roll it into your typewriter's feed.  I only wish my Royal was that luscious turquoise of her Smith Corona!

I added two vintage blue Ball jars to my metal serving basket and filled them with $5 worth of grocery store daisies.  Roses are pricey this time of year and I loved the contrast of the simple white daisies and the blue glass.
alt="metal basket blue ball jars daisies"

To even out the tablescape, I made a little piece of art.  I found these super cute vintage postcards at our local Barnes and Noble:
alt="vintage valentines day postcards"

I took a couple of pieces of scrapbook paper I had on hand and layered them to create a double-mat effect for the postcard.  I've had this frame forever and I display all kinds of holiday art and printables.

alt="valentines day vintage art"

This is a sweet little picture and may end up getting moved to another part of the house.  I have an idea for a wood block art piece that's not quite as precious, but I haven't worked out the details.  I need to go scavenging in our warehouse for some "stuff" to make it.  There are plenty of unchecked entries on my current to do list, so, this may be all the decorating I do for this particular holiday.  ;-)

This was a fun and easy little tablescape to put together.  Hope you enjoyed it!  I would love to hear how (or if!) you decorate for Valentine's Day!

alt="Valentines Day typewriter printable daisies vintage postcard"


Sunday, January 24, 2016

Sunday Supper: Ree's Spanish Baked Salmon


I am always looking for fast, delicious dinners to serve my family.  Crock pot cooking is my go-to, but this past Saturday I received a revelation.

Sheet pan dinners.  What in the world?  Why had I never heard of this?  I DVR Pioneer Woman's show on the Food Network every Saturday morning and she was doing 5 ingredient (well, not really...) recipes.  They're five ingredient plus every condiment known to man, but whatever.  One of the segments was sheet pan dinners.  Roast some veggies, throw in a protein and BAM!  Dinner's ready.  (I may be mixing my metaphors television food hosts...)

The sheet pan dinner that caught my eye was the Spanish Baked Salmon.  There were other options as well and I think the Sheetpan Sausage Supper (say that one 3 times fast) is another one we'll try, although I'm a little iffy about the parsnips.  I don't think I've ever had parsnips.  I wasn't even sure they were a real thing.  Anyway, back to this deliciousness:


Pioneer Woman's Spanish Baked Salmon

Onions, bell peppers, olives and bread cubes tossed in olive oil and baked.  Then you add salmon fillets and bake a bit more.  The whole thing's ready in 30 minutes and if you line your cookie sheet with foil, clean up's a breeze (and not this).


I added kale to my veggie list because I had some.  And I love kale.  I also used black olives instead of green.  Because I had some.  And I didn't want to go buy green ones.  To go with my rebel veggies, I served buttery orzo, which ratcheted the whole dinner up another level.   

This recipe is going on heavy rotation.  Let me know if you try it and how you like it!

30 Minute Dinner--wait!  That's Rachael, not Ree!


Saturday, January 23, 2016

Be Brave Saturday: Breaking Free


I saw this beautiful iron work today at the college campus in our town.  The gates and bars are wonderfully wrought and bring a certain beauty to a very utilitarian structure.  As I looked at them, I began to think about the gates and bars we keep on our own hearts and minds.  We put them up, piece by piece.  Curl them around our fears and bend them around our shortcomings.  We mold them into a piece of art that with enough time can come to resemble a certain severe beauty.

There is beauty in structure and beauty in order.  But the carefully curated protection we give ourselves can turn out to be just gates and bars.  We fool ourselves into thinking they have always been there, have always been a part of who we are.  Ask any young child if he is a singer and he'll say "Yes!"  and proceed to sing you his favorite song.  Ask any child if she is an artist and she'll show you her latest masterpiece with pride.  When do we stop believing these things about ourselves?  When do we start putting up the barriers to our hearts and living in narrow confines of who we can be and what we can do?

Today, and everyday, think twice when you tell your heart "You can't do that."  Open those beautiful gates and soar.  Today and everyday.

Saturday, January 9, 2016

2016 Word of the Year: Adventure

Words of the year are a new thing for our family.  Although I can look back at certain years and see that there certainly seemed to be a theme for it, we've never officially sat down together as a family and voted on a specific word to apply the upcoming year.  We've done resolutions and goals, but never a theme or word for the new year.

2015 was our "Joy" year, although we didn't call it that.  I drew some chalkboard art on our kitchen wall and each month we wrote down a daily joy.  I photographed them each month and it's been fun to reflect back on those months and days and the things that brought happiness to us--big things and small things.

This New Year's, we found ourselves traveling together on a long road trip from seeing my parents over the holidays.  I wanted to do something different for 2016 with the chalkboard wall.  I didn't know quite what I wanted to do, but I did know I wanted to incorporate a word of the year and see where that took us.  Each family member submitted a word and we voted on them--4 points for our favorite and down to 1 point for our least favorite.  The words we came up with were:  fun, adventure, patience and diligence.  Thankfully, my word, adventure won, because if patience had won, it would have been a hard year for me, indeed!

I drew the little saying on my framed chalkboard, which hangs in our breakfast area.  For the kitchen chalkboard wall, I plan to draw something else "adventure-related" and have everyone write up a short 2016 bucket list of adventures and some big goals we each want to achieve this year.  With those written lists reminding us each day, I hope 2016 is the year we reach out and reach up to make those things happen.

What brave thing will you do TODAY?

Tuesday, November 24, 2015

Pinterest Projects I Actually Completed: Cheap and Easy Holiday Frame


Well, Howdy!  I may need to introduce myself because it's been, I don't know...AGES, since I've written anything.  Life's been good, but life's been busy and the only time I have to write is in the late evening.  By that time, my brain is mush and anything I wrote wouldn't be very coherent (although it might be quite entertaining.)

Anyway, this Saturday Lil' Sis and I actually found ourselves with a free schedule and no boys in the house.  My suggestion that we spend the day in our jammies, binge-watching Once Upon A Time was met with:


via Giphy

So, I put my super suit on, and we headed out to single-handedly boost the local economy.  Several stores and one taco lunch later, I finally wore her down in Hobby Lobby when she asked if we could "Please go home?"  Light Weight.  You are no match for your mother.  Remember that always.

So, while she recuperated, I decided to get crafty and make a little frame for the kitchen counter.  I bought this little wooden frame in the $1 bins at Michael's a long time ago and had just never done anything with it.  I found some cute scrapbook paper at HL and went to town.


  • Lay the paper, pattern size down on a flat surface.  and then center the frame, on it.

  • Realize you will need something to adhere said paper to said frame.  
  • Realize you did not purchase said adherent.
  • Use your vast experience doing crafts with pre-schoolers at Sunday School and go on the hunt for Elmer's Glue.
  • Realize that at some point your children stopped using Elmer's Glue and only use glue sticks.  Not the same.
  • Miraculously find an old bottle of craft glue in the back of the cabinet.  Do happy dance.

  • Mix glue with water in a small container until it's a thin consistency.  But not too thin.  
  • Realize it's a very good thing your family is not dependent on your income as a DIY blogger.
  • Brush thin-ish glue/water to front of frame.  
  • Place it glue side down to the back of the scrapbook paper.
  • Try to fold the paper back over the frame in some kind of ninja-gift wrapping move.
  • Fail miserably and tear the wet paper.
  • Be extremely thankful that you know yourself well enough to have bought a second piece of scrapbook paper.
  • Scrape off wet, glue-y paper from frame.
  • Try again.


  • Remark to yourself that you like the second pattern better.
  • Remember that you didn't want to fold the paper over the back of the frame.
  • Cut the paper to just slightly bigger than the dimensions of the front of the frame.
  • Brush glue onto frame and place the paper on it.  
  • Smooth the paper over, very carefully, so it doesn't tear again.
  • Brush another coat of the glue on top of the paper and smooth again.
  • WAIT until it's dry.  (I capitalized that because this is the point where I usually mess up an otherwise easy craft because I have no patience.


  • Once it's dry, cut lines from the middle of the "hole" in the frame to the four corners.  Once you have four triangles, you can decide how you want to proceed.  I put double sided tape on the paper, just where it would fold over the opening and then cut off the excess.  You could just fold them in and tape the triangles to the back side of the frame.  Totally up to you how fancy you want to get.


  • I used an emery board in lieu of sandpaper to sand off the excess paper around the rounded edges of the frame. It worked beautifully and didn't tear the paper.  
  • I didn't want to leave the raw wood on the edge of the frame, but I didn't want to mess with stain, either.  I chose a brown water-based marker and "colored" the frame edge.  


  • I took a wet paper towel and wiped off the excess "stain" off the wood.  Then I took the stained paper towel and wiped it over the paper front to give it an aged look.  

I chose a couple of little printables and printed them on my home printer on card stock.  Of course, you could also put a photograph in there.  Here are the ones I chose:

from Craftberry Bush

   
from The Chronicles of Home

  You could also skip the whole folding the paper triangles thing (and I totally would have if I had done a little research first) and just stain the inside of the opening.  Here's an example of that:

from Not Just a Housewife

I love this little frame and it cost me all of $1.89 for the frame and two pieces of scrapbook paper.  It's easy to make (really, it is) and customize to the current season.  It would also make a great teacher gift for the holidays!  

If you stayed with me through this tutorial (of sorts), thank you!  My family and I wish you and yours a blessed Thanksgiving!


Thursday, November 5, 2015

Pinterest Projects I Actually Completed: DIY Gratitude Tree

Gratitude unlocks the fullness of life. It turns what we have into enough, and more. It turns denial into acceptance, chaos to order, confusion to clarity. It can turn a meal into a feast, a house into a home, a stranger into a friend.
~ Melody Beattie

Tonight at our Wednesday night Bible Study class, I heard two ladies talking about a topic they had been discussing in their small group:  gratitude vs. thankfulness.  I had never really thought about the difference.  To me, they were two words that essentially meant the same thing.  When I got home, I was still puzzling about it, so, I did what every self-respecting nerd does:  I googled it.  Most of the hits were about the semantics and grammatical uses of the two words.  But I found the quote by Melody Beattie and it really spoke to me.  Another post explained it this way:  "Gratitude is a state of being and thankfulness expresses that gratitude.
Yes.  Yes!  A state of being.  I want to always be led to express my thankfulness, but I want it to come from a state of gratitude, no matter my circumstances.
I saw this beautiful craft and tablescape on Ella Claire's blog and I had to use these precious leaves somewhere in my house this fall.


The idea was to make a Thanksgiving Tree, but after thinking about it, this tree will instead be my Gratitude Tree.  I want that in my heart year round.

So, here's how I'm using her cute printable.  I took some fall patterned scrapbook paper that I got at Michael's for 10 cents a page and cut them down to 8 1/2 x 11 so they would fit in my printer.  


I made sure to get one-sided paper and printed out the words on the white side (obviously).  I wanted the back side to have some pattern and not just be plain white.  You could tea-stain these to make the background behind the words brown, but I liked the white.  I punched a hole near the stem and used a skinny peach colored ribbon to tie them onto the branch.  I got the branch off a tree in our backyard (free-yea!) and used a galvanized bucket I purchased at a garage sale eons ago.


I stuck the branch in a quart size canning jar and was debating on what to fill the bucket with so it wouldn't show.  I didn't want to spend much money on this and I had quite a bit of scrap book paper left.  I decided to cut it into strips and "curl" it like a ribbon.  I cut them into 1" strips and if I had it to do over again, I would probably do  1/2" strips to make them look more like ribbon.  I took some old packing paper and wadded it up to fill up the bottom of the bucket.  Then I went to town curling the paper with some scissors.


Don't be jealous of my fancy scissors.  


Ella Claire included some blank leaves so that you can write down things that you're grateful for (or thankful for, if that's how you roll).  Either way, this is a beautiful way to decorate your house with things that have meaning and help keep you mindful and intentional in the way you celebrate this season. 


I hope you're all enjoying this fall season with your family and loved ones.  I would love to hear about some of your traditions and how you keep your focus on the most important things!  


Saturday, October 24, 2015

Be Brave Saturday: Sometimes You Have to Make Your Own Sunshine


We can't always change our circumstances or the people we interact with daily.  The ONE thing we can change is our attitude.  When things aren't going your way--make your own sunshine.  It's not always easy, but it beats the alternative!

What brave thing will you do TODAY?


I saw this saying on a magnet at the Junk Gypsy site and 
decided to make my own chalkboard art with it.  
I REALLY need to make it down to their store!